Monday, April 30, 2012

Tiny Aprons

Do you have Pinerest board?  I do.  It really helps me organize my thoughts with crafts; Pinerest also gives me a place to keep my ideas and inspirations.  I have a notebook too.  One of the fun things about Pinerest is following other crafters' boards.  It was Camille Roskelley's picture of a Soap Bottle Apron that inspired me to create these:


Camille gives a tutorial for her Soap Bottle Apron (here you have to scroll down a bit).  I love her quilted technique.  Of course, I have to color outside the lines (just means I have to find a different way to do something that's already been done).  I like the ruffles and the pockets.  As soon as I make a few more and get my technique down, I'll give a tutorial to show you how I did it.  Until then, find something fun to do!

-Little Mama Hen.

Linking Up

Thursday, April 26, 2012

Mug Rug

What kind of quilter/crafter are you?  Do you start a project and stick with it until completed? Or do you have dozens of projects started, all at different steps of completion.

I am the latter.  I've only been quilting for a short time, but I have dozens of projects/quilts started.  I'm a very spacial person; I like coloring outside the line. However, I like knowing the lines are there.  At times, I get overwhelmed, I just want to do it all!  I want to try every new idea and there just isn't enough time or fabric to do it all.


When I start feeling the 'lines' closing in, I pick a small, new project that I can successfully complete in a short time period.  It gives me a sense of accomplishment and still helps me feel creative.  This was my state of mind when I started my Mug Rug Wednesday evening.

What's a Mug Rug?  Well, I define it as something a little bigger than your everyday coaster, but not big enough to call a placemat. Something for your Coffee/Tea and a treat.  I've been wanting to make some, but just haven't taken the time.  My mother had given me some beautiful Poppy Flower fabric and I really like the way it turn out.  Of course, I didn't have a pattern, which was a bit more frustrating than I had anticipated.  Did you know quilters (those who create patterns) are also mathematicians!!  I had to keep trimming and cropping to make everything fit.  Boy, I'm definitely not at the level of Pattern Quilter yet.  One Day!

I hope that your weekend brings you much success in whatever you endeavor to dream and create!
*Little Mama Hen

Links to some other cool Mug Rugs


What else I found/did this week

Quilting Gallery Contest!  Yes I entered!!

Tuesday, April 24, 2012

Just thoughts, No words


Heart Quilt for Little Ladybug


 I've been working on Little Ladybug's quilt top.  I just need to add some sashing, maybe purple? She wanted hearts, so I found a great video tutorial over at Missouri Star Quilt co.  They even had some great ideas for the little scraps that are left over from making the heart block.  And I LOVE using as much material as I can!

Linking up over at Marcia's Crafty Sewing &Quilting Blog and Quilting by the River!  Check them out.  Marcia has some great ideas and helpful hints for new bloggers and all crafters!
Marcia's Party Link to share you craft!
Click here for New Bloggers!
Connie's Quilting by the River


Speaking of using as much material as we can, have you seen these...?  Ok, you can't see the picture very well.  A seller on etsy has taken all of her selvage strips and made potholders, quilts, ornaments and more.  You name and she's made it from SELVAGE!  I think she needs some sort of award for Cutest and most Economic Quilting idea!  I've started saving my selvage to make some Mug Rugs.  What do you think?  Well, I hope everyone has a great Quilting week. - Little Mama Hen.  

carolinasquirrell.etsy.com     

Saturday, April 21, 2012

OH those Biscuits!!


 In life there is something that each of us are good at or at least passionate about.  It's important to share those skills, perspectives, and/or ideas with others.  Sharing helps us grow, helps us solidify our opinions or perhaps even change our view.   It's ok to agree or even disagree with someone else's perspective/passion.  Acknowledging the importance of 'their' view is the key.

Today I want to share my Biscuit recipe!  It's simple, it's different and you may not want to try it, because it has some different indgredients.  You may be hesitant and say "no no no".  But I promise you that if you don't try it, you'll never like it.  However, if you do, you just might find something new that you like.  A little bit like life.

I love biscuits!  I have spent the last few years perfecting my recipe. When I was little my Grandma use to let me play with a little of the dough while she was making the biscuits.  Maybe this is why I let my three year old Little Man help me.   Making biscuits with, Little Man, has become a tradition.  He loves every part of the process.  A little extra flour on the table and flour don't bother me and it's so worth watching him.   Who knows, maybe one day he'll be a famous chef.  Or at the very least, when I'm old and gray, he'll know how to cook his mama some warm biscuits.


First,  you need the following items:
1 cup of whole wheat flour
1 cup of unbleached all-purpose flour
3/4 tsp salt
4 tsp baking powder
1 tbsn Sugar
1/2 cup butter (1 stick - I use smart balance)
1 cup of plain yogurt


Mix flour, salt, baking powder, sugar.   I just mix with a spoon by hand.

Add 6 Tbsp of the butter.  Cut the butter.  *Melt the last 2 Tbsp of butter to pour on the top before you add them to the oven.


If you've never cut butter before, it just means mash it with a fork until there are small pieces throughout the flour.


Add yogurt.


I just stir it with a spoon until it's nice and clumpy.  Sprinkle a little flour on a smooth, clean surface and plop down the clumpy dough.  Sprinkle a little more flour on top. And then pat and form the dough.  Don't over do it here. NO KNEADING! Just pat and form until it's not sticky.

Then, Cut the dough.  Most people probably use a biscuit cutter; however, I have a small coca cola glass that works perfect for my Little Man's hands.  But use whatever you've got.  :)  Place biscuits in an oven safe dish (mine is glass) and add the 2 Tbsp of melted butter on top of the biscuits.  Cook for 16 minutes at 450 degrees.  *Adjust time or degrees according to how your oven heats.


Enjoy!  And remember, life is sweet and too short not to share.  Happy eating.  -Little Mama Hen

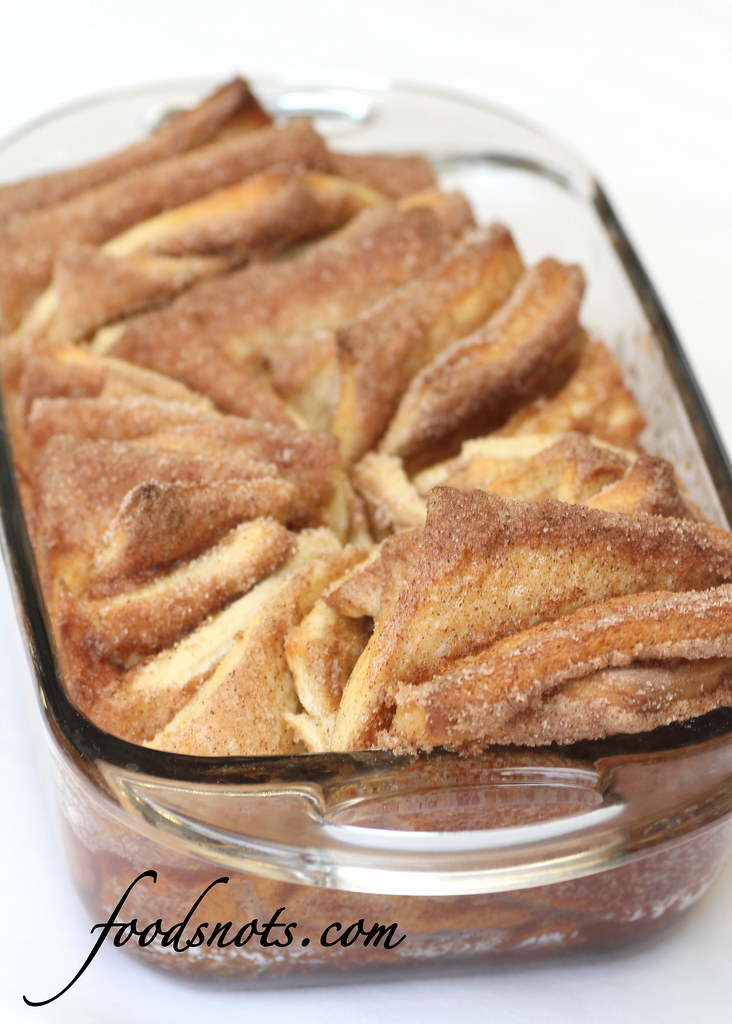
Oh, and if you're in the mood for something a little sweeter...I found this recipe over at Food Snots blog.  OMG so good!  I cheated and added some confection icing on top.  I think I probably ate half the pan.  :)

Cinnamon and Sugar Pull Aparts


Friday, April 20, 2012

Softness for Baby

They're s so soft and so sweet.  Now all I need is for some of my friends or family to start having some babies!  Anyone? Anyone?

I can't seem to stop sewing/quilting; who wants to anyway - not me!

Well, I hope everyone has a wonderful and safe weekend.  Drink a little, laugh a lot, and try something new!
-Little Mama Hen


Here's some other great crafters, take a look:

Confessions of a Fabric Addict
Crazy Mom Quilts
For the Love of Quilts
Darling Adventures


Thursday, April 19, 2012

Hold on to that Trash


Have you ever been driving and you hear a little voice from the back seat, “Here Mama”? Still watching the road and blindly waving your hand in the back seat to grasp a hold of whatever your little one is trying to hand you. For me, it’s usually trash.

Well, I found a solution to this ever growing ‘disaster waiting to happen’. Tara over at TINKERFROG had a wonderful idea. She put an adorable hand crafted fabric trash bag in her back seat. She provides an ‘easy to follow’ tutorial (tutorial here) that I immediately completed and waaalaaa. Now my 5 year old little Ladybug does not have to call on mommy to dispose of her paper in the car! A much safer road now! Of course, 3 year old Little Man still likes to try and peg Mommy in the head with his trash/toy/juice box. He'll do just about anything to make little Ladybug laugh.

I did not have oilcloth or laminate cloth on hand. I just used denim and a heavier woven fabric and added some batting to help stabilize it. I also used shorter straps and just added Velcro. Either way it’s a great craft!

Since my trash container is 100% cotton fabric I decided that I would still use a plastic bag for lining. So where should I store these little plastic bags? Well…I crafted a sweet, little matching tote to hold the plastic bags. Here’s how I did it.


Materials:

1/2" elastic (cut two 7" strips)

safety pin

2 - 4"x12" strips of cotton fabric

1- 4"x12" strip of denim fabric

1-2"x12" strip of fabric, denim or cotton for strap (I used cotton)

Instructions:

First, press the 2"x12" strap fabric in half, lengthwise, wrong sides facing. Sew about 1/4"-1/2" seam. I then went back and frayed raw edges for texture.


press both 4"x12" strips of cotton fabric in half, lengthwise


Right sides facing, match raw edges of both strips of cotton fabric to raw edges of denim fabric lengthwise. Don't forget to place the strap in between the denim and cotton layers. It doesn't really matter where. Just make sure the raw edges are matching. Sew raw edges together. I then went back and pressed and top stitched seams toward center.


Create a casing for the elastic strips. Sew a 3/4" casing stitch from the folded end of top of cotton fabric. Pin elastic to safety pin and insert in casing. Stitch closed raw edges of casing, being sure to catch the elastic. Repeat to bottom folded end.


With right sides together sew 1/4"-1/2" seam. Pull right side out and add trash bags to the top elastic hole and pull them out from the bottom elastic hole.


TADA! Larger versions of this tote are really great for the laundry room and kitchen too. I use grocery bags at our house, a good way to recycle.

Happy Sewing,
Little Mama Hen

My Best Friend Life is a wonderful opportunity to explore and cling to what makes you happy.  His love is constant and steady, nothing I'...